Starting Point:
Hardware:
1. Edison SOC on a Radio Board by Enhanced Radio Devices.. This was called the Explorer board but its no longer made.
2. An Edison SOC - available on Ebay mostly. This was obsoleted by Intel in 2017 I believe. Sad, as it is a very powerful x86 based SOC.
Software:
This is what you need: OpenAPS Docs
Getting Started:
Open APS Installation
Flashing the Edison SOC:
Flashing with a PC
Save yourself some greif and install Jubilinux 0.20 and not 0.30 as it mentioned in the docs. In an ideal world 0.30 should work, but this is not an ideal world!
Once you get connected to the rig with Putty (assuming you are sane and use a PC and not a MAC) you need to run the setup/bootstrap script.
This will install the latest version of OpenAPS onto your rig as a Git repository. (Look that up if you are interested)
It will also install a bunch of dependencies (other software packages that you need) along with
updates for the Debian Operating system. The rig will be running the Jessie version of Debian when you are done (version 8.x).
Follow the directions to run the installation script and when you choose what type of CGM you are using you need to type in "xdrip-js" wihout the quotes.
What you are doing by typing in xdrip-js is that you want to run with an online/offline rig where the Edison SOC and radio board communicate with your Pump via Bluetooth (that's not obvious is it!).
At the same time you are also telling the OpenAPS package to install another package called xdrip-js. xdrip-js is an entirely different project on Github! Again, not obvious!
At one point in the installation script it will ask you if you want to continue, you need to say YES. If you stop short, not everything will be installed. At that point you still have a long ways to go.
At some point in the installation script you will have a failure. Linux is an ever changing Operating system and somethings are changing which makes the installation not always stable. That's ok, this will still work. When things stall (stop, die, whatever you want to call it), you will need to enter three commands to continue. Note one failure message will say something about Nightscout Crud (yes, Crud).
As of today (3/26/2020) you need to enter these three commands at the prompt, one at a time and then rerun the bootstrap script (yep, all over again.. be patient, its worth it!)
pip install -U pip
pip install --upgrade setuptools
pip install gitdb2==2.0.6
Then rerun the bootstrap script. What I do is wipe the script and control-c to copy it, then go to Putty and right click at the command prompt. That will paste the script into the command line, then hit return and wait!
Remote SSH Support - What is that and why would you want it?
The common way to communicate with the rig is either via a cable or via SSH. SSH is a secure (read encrypted) way to communicate with devices over a network. Since the interface to the rig is a command line, not a graphical interface, SSH is fine.
This was not my idea, I first saw it on the Openaps website. Reverse SSH via a cloud server
The link above regarding a Reverse SSH connection is abbreviated and really understates the requirements to get that working.
After you have had OpenAPS running for a while the need will become obvious. The problem is that Openaps runs on a very small computer which is oftentimes hanging off your belt creating a loop between your CGM and your Pump. If you go high, your Openaps "rig" will tell your pump to push in more insulin, if you are going low it will tell your pump to stop pushing in insulin. The problem is that the Openaps rig does not have an screen or keyboard. It is what is called a "headless computer". So if you want to change something on the rig you need to connect to it with some other device that has a screen and keyboard. Sure, you could drag a computer around everywhere with a cable but that isn't very practical. Also no one else but you can get to your rig, unless they are on the same wifi or they are local to you (like sitting next to you). My daughter lives 500 miles away.
Also, xdrip-js requires frequent interaction with the rig at the command line level. Both to get it going and see if it is working and to debug issues and to change sensors and transmitters. So that makes this all much more important.
What's required?
First, you need a server which is on 24x7 and has a static IP address which is fully visible to the web. This server will act as jump server to connect two devices that are both behind firewalls.
For instance; Say your rig is connected to your phones hotspot and that is linked to T Mobile and then to the web.
And you also have a tablet and it is connected to your apartments Wifi router which is served by Comcast.
That means that those two devices are on entirely different networks. They might as well be located in different states, even though they are inches away from each other.
Even crazier, lets say your tablet is 4G enabled and also connected to T Mobile as is your phone. T Mobile (and most other cell companies) doesn't allow incoming connections, so you still can't connect between your tablet and your rig. However, if you used your phones hotspot for both your rig and your your tablet, it is possible with some effort to connect between a tablet and your rig in that manner. However that would require you to find out your rigs IP address on your phone and that would require yet another software tool.
Implementing a SSH jump server
The most practical way to do this is to establish a server computer that runs "on the cloud". Its a "virtual" server computer that will be one of hundreds which are all running on a single hardware computer in a server farm someplace on the web. Companies that provide a service like this are AWS, Digital Ocean and dozens of others including Microsoft. I chose Digital Ocean because of their excellent support for Ubuntu, their ease of use and their low cost ($5/month).
What is required is to setup a Droplet ( a server instance ) with Ubuntu, either the latest Ubuntu version or the latest LTS (Long term support) version. I used Ubuntu 19.04 but I should ave chosen Ubuntu 18.04 LTS as there is really no advantage of 19.x over 18.04 for this purpose.
You then need to setup some users.
1. You as the administrator will be setup by Digital Ocean when you create the Droplet (server instance)
2. A user which will be the rig.
3. A user which will be the device that access the rig via the SSH jump server.
Then you will need to create some key pairs (RSA) so you don't need to use a password when the users log into their accounts on the SSH server. The administrative RSA key is setup when you create the Droplet (server instance). Make sure you create a RSA key pair before you create the Droplet. If you mess up, delete the Droplet and start over.
Creating RSA Keypairs on Ubuntu: Creating Key pairs for ssh
I would create the keypairs on the actual cloud server and then move the private key (the key that is used by the device connecting to the server) off the server with Filezilla.
Filezilla is an SFTP program that can easily move files around on Linux. Filezilla runs on Windows which is what most people run on their home desktop or laptop computers.
Pay attention to the permission level of the files and the keys. The folders should be 700, and the actual key files 640. Filezilla can also set file permissions on Ubuntu remotely which is really handy. If you do that you can skip learning the Linux commands chmod, and chown.
Then you need to make sure that you have the ssh client and server installed on your Digital Ocean cloud server.
There are a number of how to's on the web to do this.
Here is one: How to install SSH server and client on 18.04 server
Setting up the Rig for connection to the SSH Server
Since the rig doesn't know when you want to talk to it remotely, it needs to stay connected to the SSH jump server whenever it has access to the web.
This is done with a program called autossh. Refer to this link again: Reverse SSH via a cloud server
You want to install autossh on your Edison rig as it shows in the above link except that there are a few needed changes, so please refer to the instructions below:
On the rig, install autossh:
apt-get install autossh
Note that autossh is different than ssh. autossh is designed to keep an ssh connection maintained to a server. It will retry periodically forever based the the retry settings that are below.
Your ssh environment must be setup to use key based authentication. (Basic instructions are here.)
On the rig, add the lines below to the /etc/ssh/ssh_config file.
     ServerAliveInterval 60
     ServerAliveCountMax 5
On the server, add the lines below to the /etc/ssh/sshd_config file.
     ClientAliveInterval 60
     ClientAliveCountMax 5
The configuration values above ensure when the rig moves from wifi network to wifi network, it will require 5 minutes at most for autossh to establish a new link to the server.
At the rig try this command:
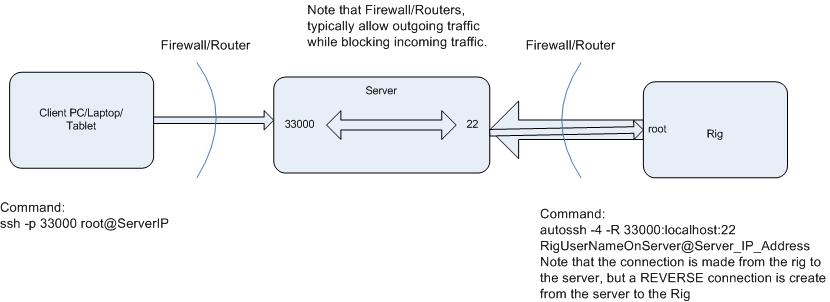
autossh -4 -R 33000:localhost:22 RigUserNameOnServer@Server_IP_Address
This command causes the rig to ssh to the server using the user: RigUserNameOnServer at the Server_IP_Address and then once the connection is made,
a reverse tunnel is created from the Server to the Rig. The -R signifies reverse tunnel, and -4 means to use IPV4 addressing only. Internally in the server a connection is made between incoming port 33000 and port 22 which is connected to the Rig.
So now if an outside device like a Tablet or PC wants to connect to the Rig, an SSH command needs to be run on the tablet or PC that looks like this:
ssh -p 33000 root@Server_IP_Address
Ports on the server below about 32000 can be dedicated to other things. So its much safer to keep that address well above 32000.
What happens is that ssh will attempt to connect to the port specified as 33000 on the server. And it will use the log on as root (which is the login that you would use if you were connected directly to the rig with Putty) but you are logging onto the server at port 33000. Once that happens, it is like you are connected from your PC to the rig with Putty; You are trying to log onto the rig, so the rig will ask you for a password. (Remember you already told the rig that you were logging on as root). Now you type in the password that you normally use for the rig and you are online, except that you are being routed through a cloud server. Pictorially it looks like this:
On the Cloud Server - in order to make this work:
1. Port Forwarding must be enabled. That is done by editing a file called sshd.config and editing the selection for port forwarding to yes. Below are link to the manual pages ssh.config and sshd.config which is for the client and the server configuration.
http://man7.org/linux/man-pages/man5/ssh_config.5.html
http://man7.org/linux/man-pages/man5/sshd_config.5.html
Also, if you setup a SSH server like this you will find that using Port 22 for a listening port for the rig may not be a good idea. Unfortunately there are thousands of idiots out there scanning ports attempting to log into a server. Their purpose is likely devious. A common fix for this is to change the rig listening port to some other value than the standard 22 for SSH. A number like 4160 or 4170 should work and keep the idiots and their bots off your server. The default ssh server listening port is set in sshd.config (see links above).
As such the command on the Rig will change since it is no longer using port 22. Now it will look something like this:
autossh -p 4160 -4 -R *:33001:localhost:22 [email protected]
Explanation: When the rig runs this command it tries to establish an ssh link to port 4160 on the server (-p 4160). The server is at IP 64.227.xx.xxx and the rigs user name on the server is aps1. Once a connection is made, a tunnel will be created on the server between port 33001 and port 22 ( Port 22 on the rig!). Remember that the rig connects to the server at port 4160. So the 22 in this case is the actual port on the rig for the reverse ssh connection. the *: is probably not needed but it means that any IP connected to port 330001 is ok. The -4 still means to use IPV4 addressing only and not IPV6, which the rig does not understand.
So this should work.
But everytime you start your rig you would need to enter this command, and that is, at the least, inconvenient!
So we will setup a cron job in the rig so it runs this command on a reboot of the rig or a power up.
cron is a powerful scheduler in Linux that can do a number of things, including running programs at startup.
At the rig command line enter: cron -e
A window will open with the nano editor. Paste in the following line:
@reboot sleep 60; autossh -N -f -p 4160 -4 -R *:33001:localhost:22 [email protected]
Save the file and reboot the rig. 60 seconds after it boots, it will run the autossh command line and attempt to connect to the ssh server.
How SSH Keys work!
SSH keys are nothing more than strings of characters in a certain format. They are unremarkable to look at. However they act as a Key to your server, only allowing certain users who possess the key to access your server.
SSH keys work like this: A public key resides on the server. (Don't get hung up on the naming) A private key resides on the client (a device that wants to connect to the server)
When the client asks to connect to the server, the server gives the client its public key. Since the client now has the public key from the server and also the private key, it can use both keys to decipher messages. The server then poses a question to the client, and using both of the keys, the client answers the questions. If the answer is correct, the server allows the client to access the server.
So there are two components as mentioned. The public key gets transmitted to the client. The private key is never transmitted anywhere (it remains private). That makes this a secure system. The most common type of SSH key used now is the RSA key. As I mentioned before here is a link to the particulars about RSA key pairs (public and private).
Here it is again: Creating Key pairs for ssh
Where are SSH keys needed?
Keys are needed wherever a Client -> Server connection is needed.
So in this case we need two sets of Key Pairs.
1. The PC/Laptop/Tablet Client to the Server
2. The Rig to the Server
When you setup your server on Digital Ocean you might have created a key pair before you created your Droplet (Server ).
So no what has to happen is that you need to create two sets of key pairs - one for each connection.
On your rig, logon as you normally do (you should be root, with a password), then type
ssh-keygen -t rsa
Then hit return a couple of times and don't enter a password for the keys. Note the messages as it will tell you were it put the keys on the rig.
Next you need to get the public key onto the remote cloud server.
ssh-copy-id remote_username@server_ip_address
It will ask you for the password that you setup for remote_username on the cloud server. Enter that and it will copy the public key into the proper location on the cloud server.
So that takes care of your Rig automatically logging onto the remote cloud server.
Next is your Tablet or laptop and this can get a little more complicated. If you are using a Linux computer to access the cloud server, you do things on your Linux computer just as you did on the Rig to create the keypair and then copy the public key to the cloud server.
In this case you might want to log onto your cloud server as the Tablet or Laptop client's user name and password and then run the same command above ssh-keygen - t rsa. But now the keys are in the wrong place. The public key and private keys are in the locations specified on the server.
What I have done in the past is to load Filezilla on a Windows laptop and move the private key off the cloud server and put it onto my client device (PC,laptop,tablet etc) Then you need to load the public key into the proper location on the cloud server.
The proper location for the public key on the cloud server is in a file called "authorized_keys" which resides in a directory at ~/.ssh/
The file called authorized_keys can cannot many public keys. Each public key takes up exactly one line in the file.
The best way to get the public key into the authorized_keys file is to use the cat command.
So log onto the cloud server with your PC,laptop,tablet account name and password:
When you ran the ssh-keygen -t rsa command it created the .ssh directory in the users home directory (~ means home directory)
Now run this:
cat ~/.ssh/id_rsa.pub >> ~/.ssh/authorized_keys && chmod 600 ~/.ssh/authorized_keys
That should get the text string that is in id_rsa.pub copied into the file authorized_keys.
Now all you need to do is to load the private key which you copied off the server with Filezilla onto your PC/Laptop/tablet and setup an SSH client program on that device so you can access your rig which is now connected to the SSH server!
For Android tablets and phones, I recommend JuiceSSH which is a free client on Google Play. It works great and it is actually easier to setup on a phone or tablet than setting up a Client like Putty on a PC.